tensorflowで物体認識(YOLOv2)をやってみる 2
前回、前々回でやっているtensorflowでYolov2なのですが、
参考にしているものがもう一つありましたので動作させるところまで書きます。
↓github↓
github.com
[環境]
win7 64bit
GTX 960
python3.5
tensolfolw 1.2.1
[動作手順]
1.先ほどのリンクに行きソースをDL、解凍
2.下のリンクをクリックしてDL。さきほど解凍したフォルダにbinという名前でフォルダを新規作成して入れる
https://pjreddie.com/media/files/yolo.weights
3.コマンドラインで先ほど解凍したフォルダに移動して
python setup.py build_ext --inplace
でインストール
4.githubのREADMEの”Using darkflow from another python application”に書かれているプログラムを参考に実行してみる
↓パスの部分を少し変えてます
[test.py]

from darkflow.net.build import TFNet
import cv2

options = {"model": "cfg/yolo.cfg", "load": "bin/yolo.weights", "threshold": 0.4, "gpu": 0.3}

tfnet = TFNet(options)


input_image = "sample_dog.jpg"
image_folder = "sample_img"
current_path  = os.getcwd()
current_path =  os.path.join(current_path,image_folder)

src = cv2.imread(os.path.join(current_path,input_image))
result = tfnet.return_predict(imgcv)
print(result)
実行
python test.py
メモリエラーが出る場合は"options"で指定しているgpuの値をもっと引き下げてください
結果
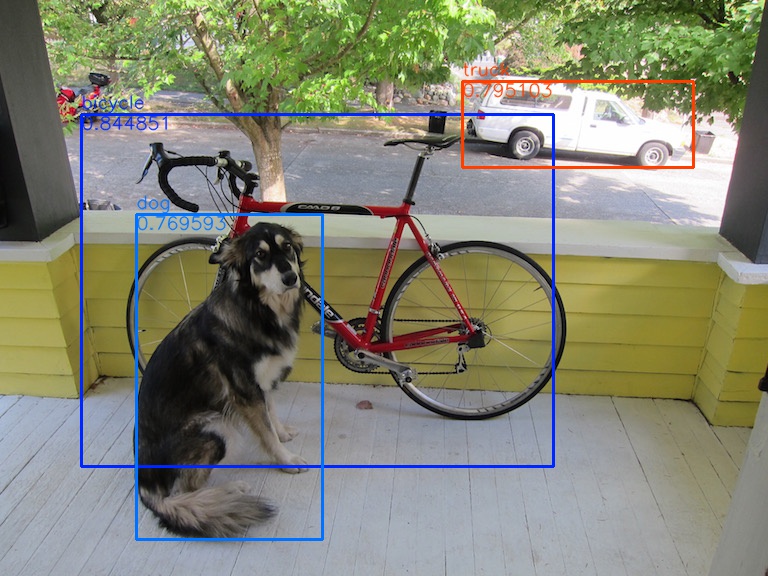
[{'label': 'bicycle', 'confidence': 0.8448509, 'topleft': {'y': 114, 'x': 81}, '
bottomright': {'y': 466, 'x': 553}}, {'label': 'truck', 'confidence': 0.79510289
, 'topleft': {'y': 81, 'x': 462}, 'bottomright': {'y': 167, 'x': 693}}, {'label'
: 'dog', 'confidence': 0.76959282, 'topleft': {'y': 214, 'x': 136}, 'bottomright
': {'y': 539, 'x': 322}}]
[画像表示]
結果は得られましたが、これでは見にくいので画像に結果を表示させようと思います。
返答値を分解すればいいんですが面倒になったので
今回は検出部に直接描画用コードを書いてしまいました。
-
-
-
-
-
-
-
-
-
-
-
-
-
-
-
-
-
-
-
-
-
-
-
-
-
-
-
-
- -
-
-
-
-
-
-
-
-
-
-
-
-
-
-
-
-
-
-
-
-
-
-
-
-
-
-
-
[2017/9/25]追記
YOLOv2のリアルタイム物体検出をTensorFlowとPythonで実装する方法 | AI coordinator
このブログの公開1日前にここのお方がメインで描画するソースを公開してくださいました。
動画での解析になっているので読み込みなどの部分を変える必要がありますが、、
-
-
-
-
-
-
-
-
-
-
-
-
-
-
-
-
-
-
-
-
-
-
-
-
-
-
-
-
- -
-
-
-
-
-
-
-
-
-
-
-
-
-
-
-
-
-
-
-
-
-
-
-
-
-
-
-
以下、メインです。
[test.py]

from darkflow.net.build import TFNet
import cv2
import os
import json

options = {"model": "cfg/yolo.cfg", "load": "bin/yolo.weights", "threshold": 0.4, "gpu": 0.3}
tfnet = TFNet(options)

input_image = "sample_dog.jpg"
image_folder = "sample_img"
current_path  = os.getcwd()
output_file = "out"
current_path =  os.path.join(current_path,image_folder)
output_path =  os.path.join(current_path,output_file)
if not os.path.exists(output_path):
    print('Creating output path {}'.format(output_path))
    os.mkdir(output_path)

src = cv2.imread(os.path.join(current_path,input_image))
dst = src
cv2.imshow("img", src)

result = tfnet.return_predict(src,dst)
print(result)

cv2.imshow("img_out", dst)
cv2.waitKey()
cv2.imwrite(output_path + '\\' + input_image, dst)
次にメイン文で呼んでる tfnet.return_predict()の中身を書き換えます。
場所は"darkflow-master\darkflow-master\darkflow\net\flow.py"です。
[flow.py]
#importの追加
import cv2
import random
import colorsys

#メインで呼んでる関数の中身変更
def return_predict(self, im ,dst , output_image = True  ):#引き数追加
    assert isinstance(im, np.ndarray), \
				'Image is not a np.ndarray'
    h, w, _ = im.shape
    im = self.framework.resize_input(im)
    this_inp = np.expand_dims(im, 0)
    feed_dict = {self.inp : this_inp}

    out = self.sess.run(self.out, feed_dict)[0]
    boxes = self.framework.findboxes(out)
    threshold = self.FLAGS.threshold
    boxesInfo = list()

    #描画する色の指定
    hsv_tuples = [(x / 80, 1., 1.)
                  for x in range(80)]
    colors = list(map(lambda x: colorsys.hsv_to_rgb(*x), hsv_tuples))
    colors = list(
        map(lambda x: (int(x[0] * 255), int(x[1] * 255), int(x[2] * 255)),
            colors))
    random.seed(10101)  # Fixed seed for consistent colors across runs.
    random.shuffle(colors)  # Shuffle colors to decorrelate adjacent classes.
    random.seed(None)  # Reset seed to default.
    i=0

    for box in boxes:
        tmpBox = self.framework.process_box(box, h, w, threshold)
        if tmpBox is None:
            continue
        boxesInfo.append({
            "label": tmpBox[4],
            "confidence": tmpBox[6],
            "topleft": {
                "x": tmpBox[0],
                "y": tmpBox[2]},
            "bottomright": {
                "x": tmpBox[1],
                "y": tmpBox[3]}
        })
        #描画
        if output_image:
            cv2.rectangle(dst,(tmpBox[0],  tmpBox[2]), (tmpBox[1], tmpBox[3]), colors[i], 2)
            fontType = cv2.FONT_HERSHEY_SIMPLEX
            cv2.putText(dst,  tmpBox[4], (tmpBox[0],  tmpBox[2] - 6),fontType , 0.6,  colors[i],1,cv2.LINE_AA)
            cv2.putText(dst,  str(tmpBox[6]), (tmpBox[0],  tmpBox[2] + 15),fontType , 0.6,  colors[i],1,cv2.LINE_AA)
            i+=1
    return boxesInfo
実行
python test.py
結果

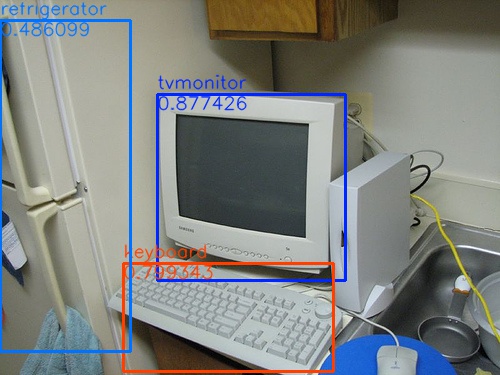
sample_computerの結果

sample_computerのprint文結果
[{'bottomright': {'x': 345, 'y': 280}, 'confidence': 0.87742555, 'topleft': {'x'
: 157, 'y': 94}, 'label': 'tvmonitor'}, {'bottomright': {'x': 333, 'y': 371}, 'c
onfidence': 0.79934323, 'topleft': {'x': 123, 'y': 263}, 'label': 'keyboard'}, {
'bottomright': {'x': 130, 'y': 351}, 'confidence': 0.48609883, 'topleft': {'x':
0, 'y': 20}, 'label': 'refrigerator'}]
関数の引き数ごと変えちゃったけどまぁいいか。。
[参考]
YOLOv2(TensorFlow)を使ってリアルタイムオブジェクト認識をしてみる - Qiita
おわり